The Project - 2.0.5
Multipurpose HTML5 Template
- created: 08/05/2015
- latest update: 16/09/2017
- by: HtmlCoder
- email: htmlcoder.me@gmail.com
Thank you for purchasing our theme. If you have any questions that are beyond the scope of this help file, please feel free to contact me http://htmlcoder.me/support I will glad to help you :-)
Update from version 2.0.0 to 2.0.5
The version 2.0.5 includes two distributions, the first is Bootstrap 3 based and the second is Bootstrap 4 based:
1. Bootstrap 3 distribution
- No changes since v2.0.0
2. Bootstrap 4 distribution
- Updated bootstrap to v4.0.0-beta
- Updated Slider Revolution to 5.4.6
- Improved animations initialisation
- Improved counters implementation
- Improved modernizr implementations
- Improved isotope implementations (filters in portfolio pages)
- Fixed animation issue on safari
- Fixed google maps trigger issue (page-contact-3.html)
There are major changes in bootstrap 4-beta version, you can find the list of the changes in the link that follows https://github.com/twbs/bootstrap/releases/tag/v4.0.0-beta.
Affected Files/Folders:
- bootstrap folder
- css/style.css file
- js/template.js file
- js/google.map.config.js file
- sass folder
- plugins folder
- all HTML files
It is not possible to upgrade from Bootstrap 3 based distribution to Bootstrap 4 based distribution
Files Structure
- template (The Project template)
- - bootstrap (All Bootstrap files. We keep all of them in this folder to make updates easily)
- - css (CSS files of the template)
- - - skins (CSS skin files)
- - email_templates (HTML email templates)
- - fonts (External font libraries)
- - - font-awesome
- - - fontello
- - images (All the images of the template)
- - js (Javascript files of the template)
- - sass (All the sass files of the Project's template)
- - php (PHP files of the template)
- - plugins (All external libs. We keep all of them in this folder to make updates easily.)
- - videos (All video files)
Html Structure
1. Bootstrap 3 distribution
The template is based on Bootstrap 3 Framework - https://getbootstrap.com/docs/3.3
Bootstrap includes a responsive, mobile first fluid grid system that appropriately scales up to 12 columns as the device or viewport size increases.
If you need more information, please visit this site: https://getbootstrap.com/docs/3.3/css/#grid
2. Bootstrap 4 distribution
The template is based on Bootstrap 4 v4.0.0-beta Framework - http://getbootstrap.com/
Bootstrap 4 includes a powerful mobile-first flexbox grid system for building layouts of all shapes and sizes.
It’s based on a 12 column layout and has multiple tiers, one for each media query range.
If you need more information, please visit this site: https://getbootstrap.com/docs/4.0/layout/grid/
CSS Structure
Folder bootstrap
This folder contains all the Bootstrap stylesheets
- bootstrap/css/bootstrap.css (Generic styles, responsive grid styles, resets & normalization)
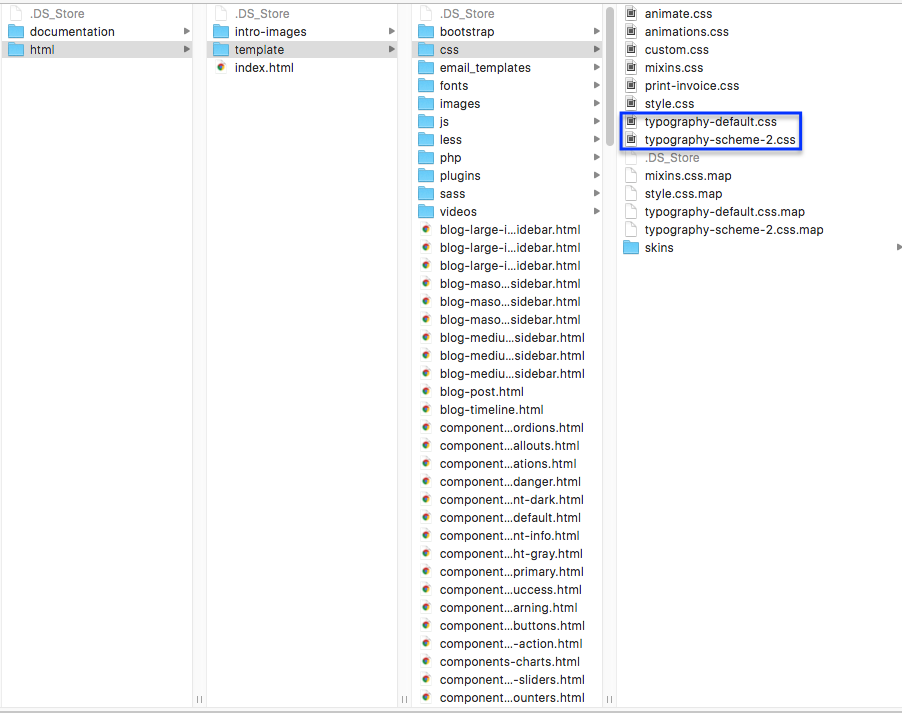
Folder css
- css/style.css (This stylesheet contains all the style rules of the template, do not modify this file, place all your custom css rules into custom.css file.)
- css/animations.css (This stylesheet contains all the css rules for the animations of the template)
- css/animate.css (This stylesheet contains css rules for the animations of the template) it is imported into the animations.css
- css/print-invoice.css (This stylesheet contains all the print css rules for invoice)
- css/typography-default.css (This stylesheet contains the default typography scheme of the template, see Typography section)
- css/typography-scheme-2.css (This stylesheet contains an alternative typography scheme, see Typography section)
- css/print-invoice.css (This stylesheet contains all the print css rules for invoice)
- css/custom.css (In this stylesheet you should put your own custom css rules so that you can update the template without issues when new versions will be released)
Folder css/skins
- css/skins/blue.css (blue skin)
- css/skins/brown.css (brown skin)
- css/skins/cool_green.css (cool green skin)
- css/skins/dark_cyan.css (dark cyan skin)
- css/skins/dark_red.css (dark red skin)
- css/skins/gold.css (gold skin)
- css/skins/gray.css (gray skin)
- css/skins/green.css (green skin)
- css/skins/light_blue.css (light blue skin)
- css/skins/orange.css (orange skin)
- css/skins/pink.css (pink skin)
- css/skins/purple.css (purple skin)
- css/skins/red.css (red skin)
- css/skins/vivid_red.css (vivid red skin)
Javascript
Folder js
- template.js (The initialization of the elements, libs and features is made by the this file, do not modify this file, place all your custom js code into custom.js file.)
- custom.js (You should place your custom scripts in this file, so that you can update the template without issues when new versions will be released)
- google.map.config.js (Configuration of google map in contact page see below)
- coming.soon.config.j (Configuration of coming soon page see below)
Folder plugins
All external js libraries are in the plugins folder. We keep all of them in this folder to make updates easily.
RTL support
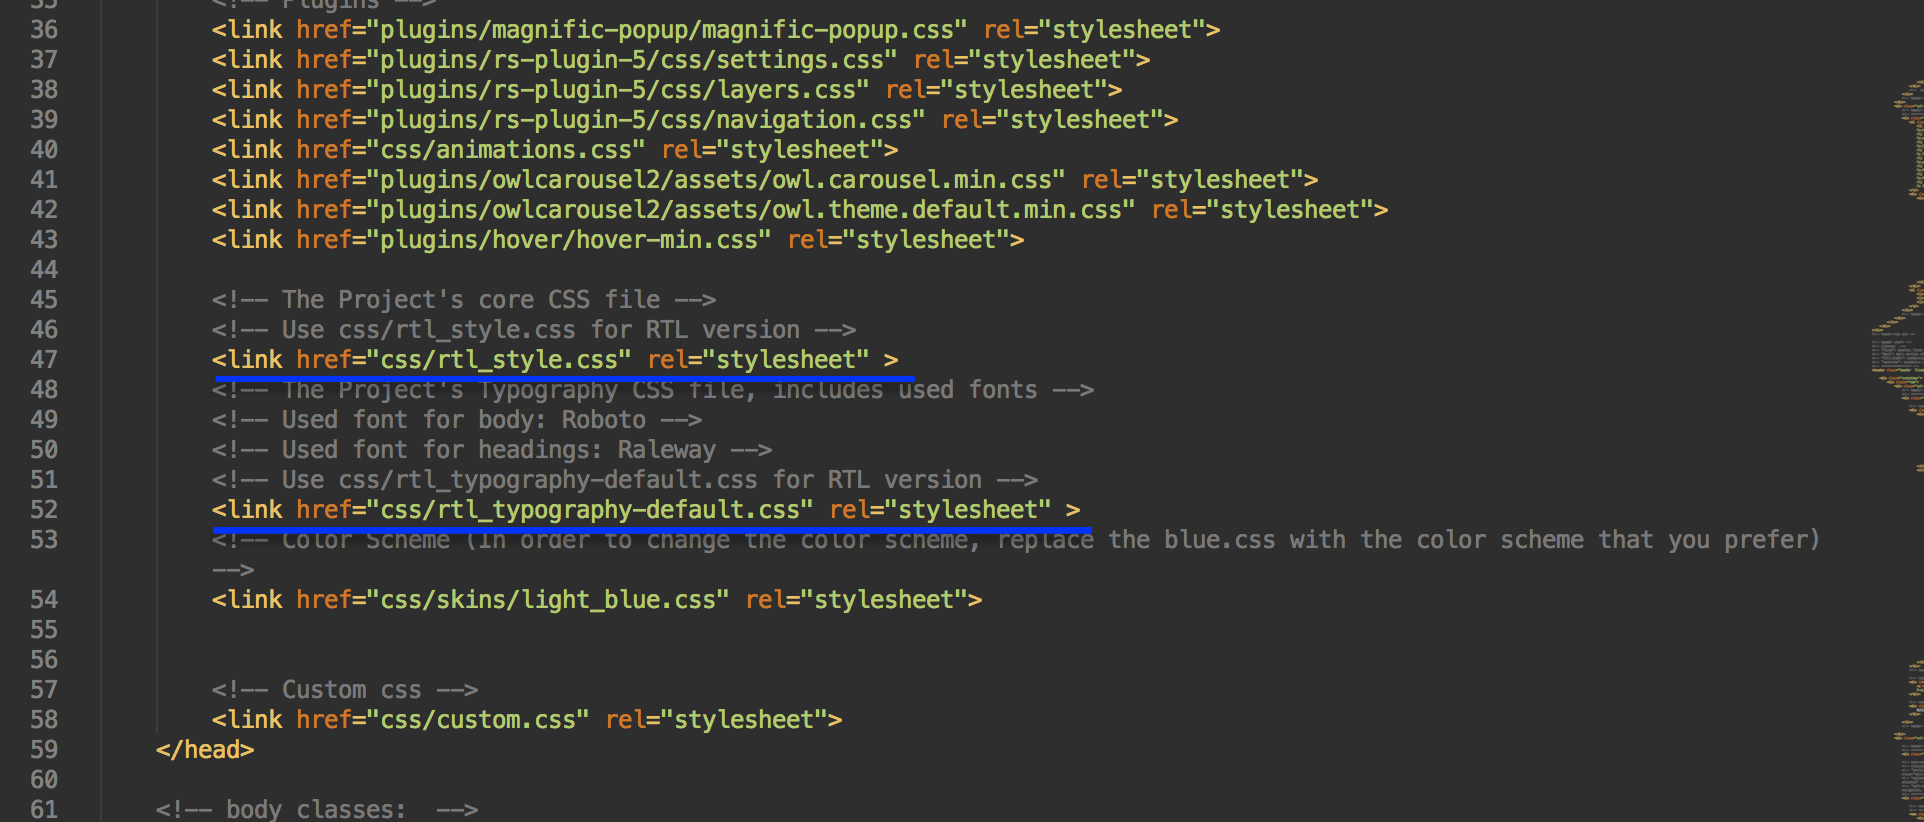
In websites with right-to-left text direction, use the following CSS files in the head section of your HTML file:
- css/rtl_style.css
- css/rtl_typography-default.css
instead of css/style.css and css/typography-default.css.
Every HTML file in the template can be used in websites with right-to-left text direction, by replacing the style.css with rtl_style.css file and typography-default.css with rtl_typography-default.css file, in the head section.
We have prepared an example index-rtl.html page, so that you can use it as a guide. If you face any issues related with RTL version, please report it to support.
LTR, RTL and SASS
The Project template, uses sass mixins smartly (in A1 group, see diagram), in order to create both left-to-right and right-to-left versions from the same core (styling) sass files.
In the following diagram you can see the structure and the logic of the sass files inside the template:
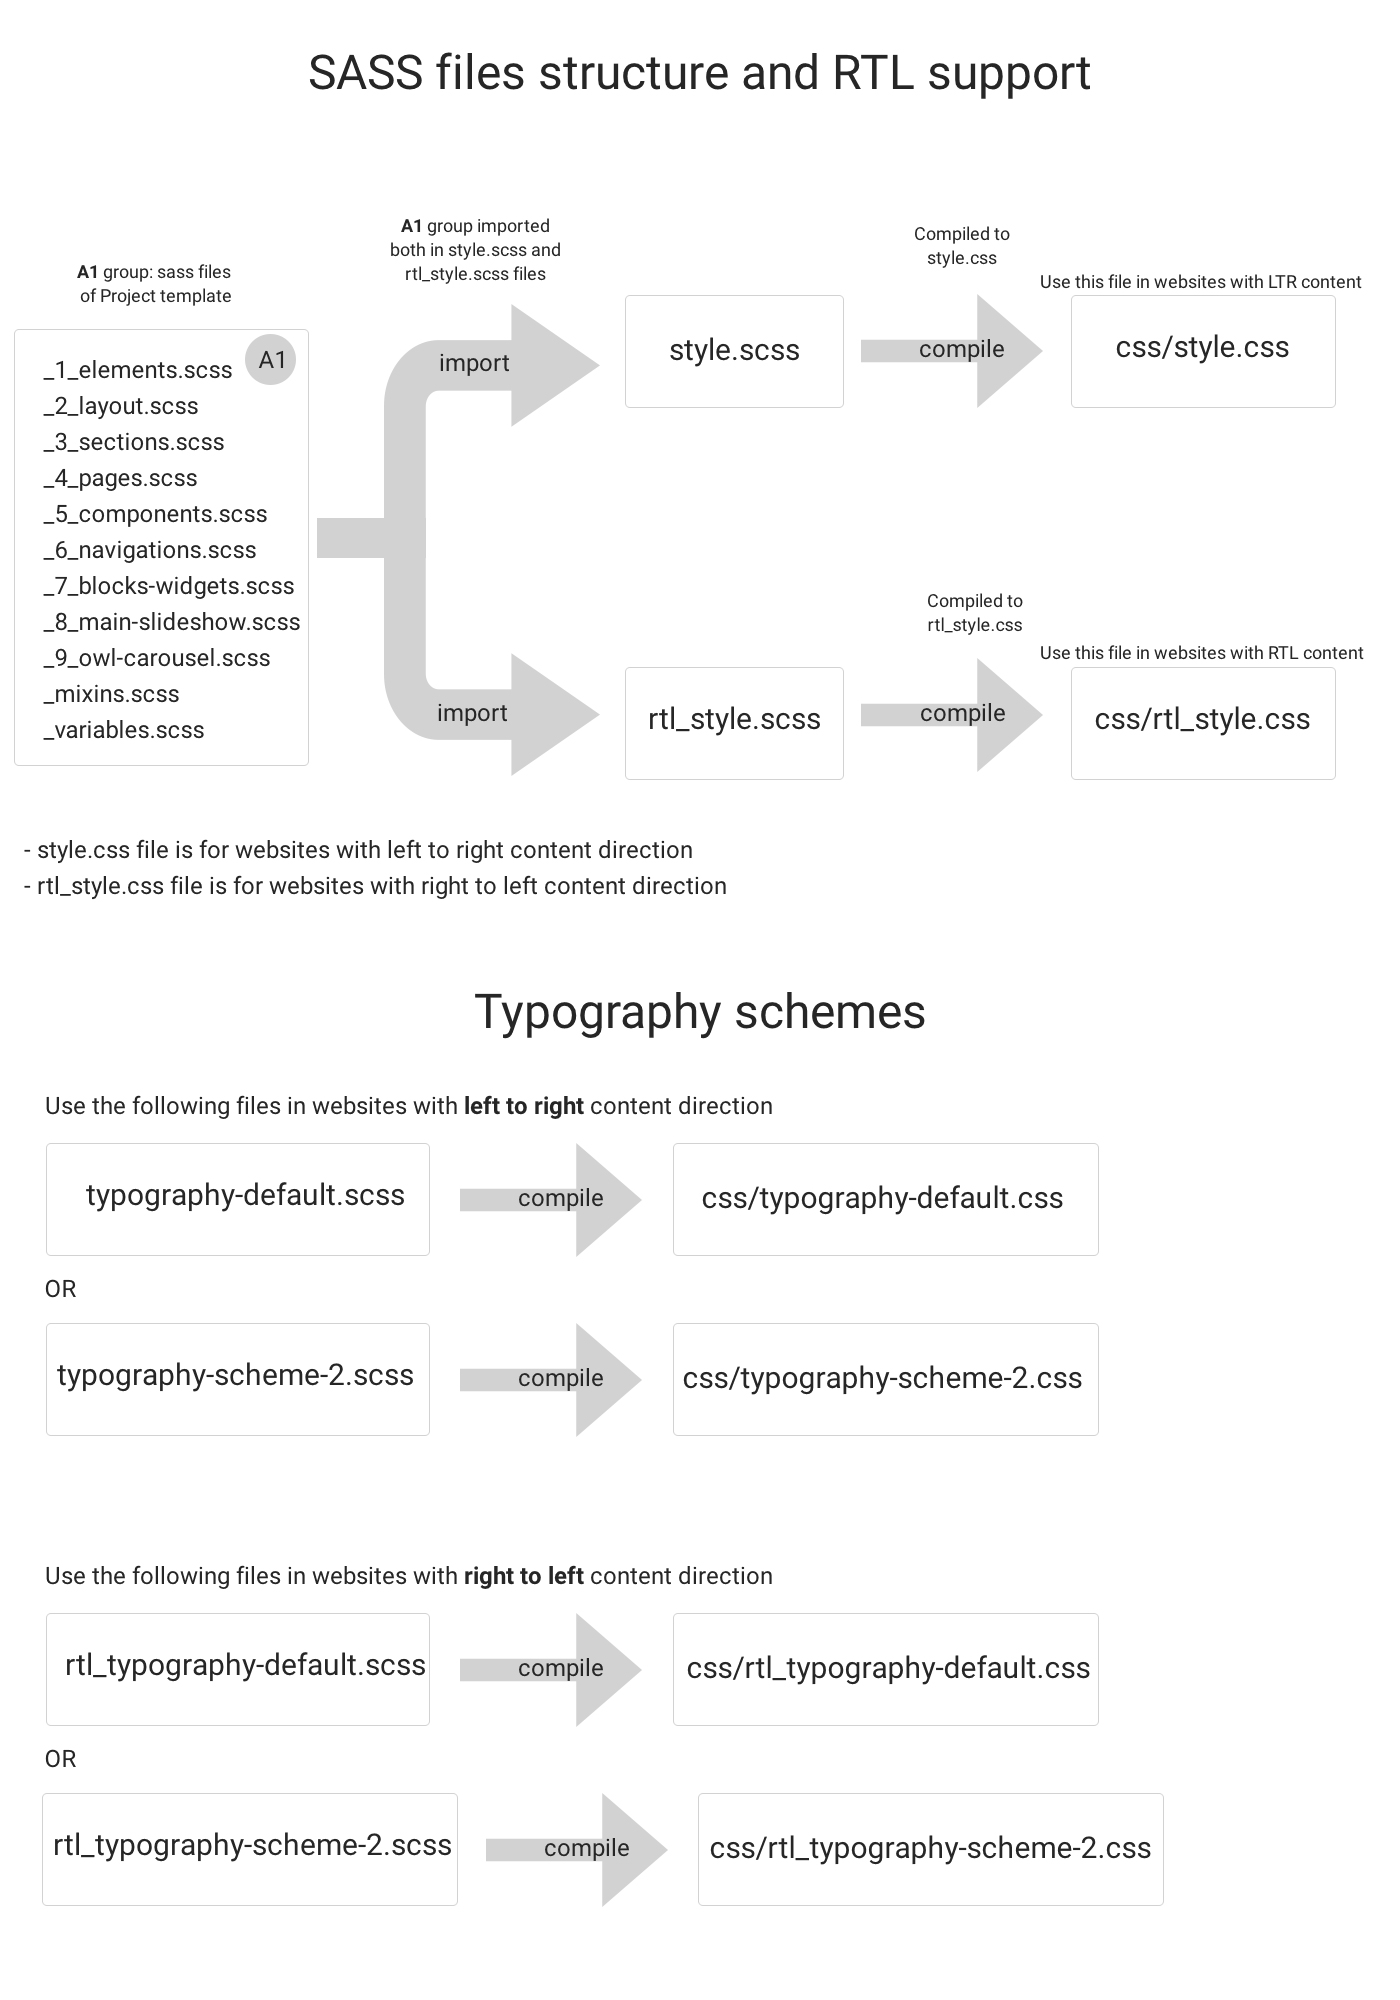
RTL version is not supported with LESS preprocessor in the Project template, if you are planing to build RTL websites please use SASS preprocessor.
Typography
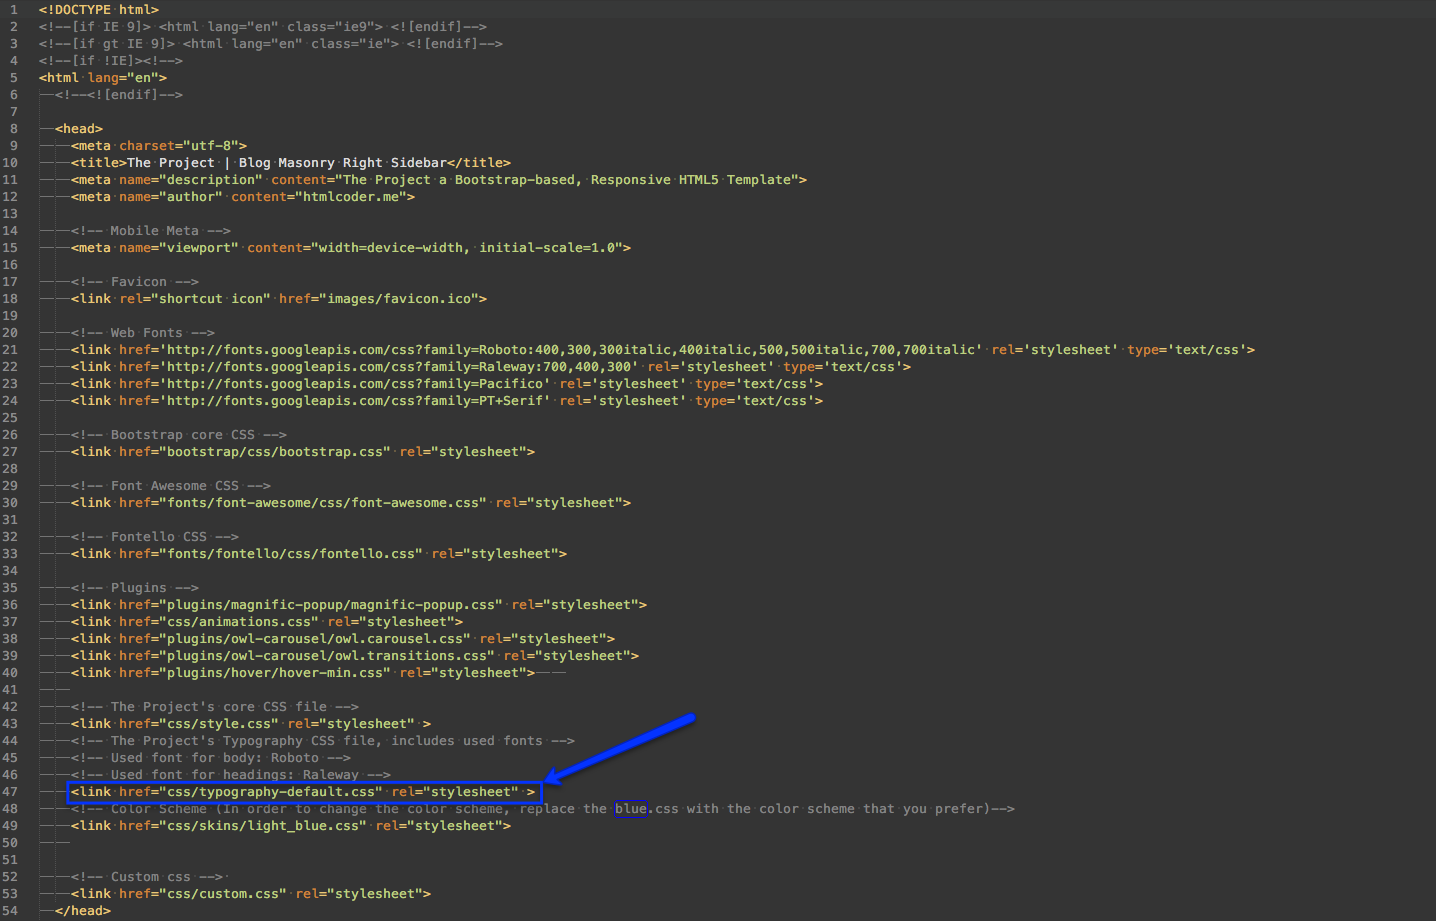
In version 1.3 we have separated the typography CSS rules from the style.css file, in order to easily change and/or add new typography schemes to the template.
In css folder you will find typography schemes files:
-
typography-default.css: Is the default typography scheme of the Project's template. Used font families and CSS rules are the same with the previous versions of the template.
If you are planing to update your site, in order to keep this font scheme add a reference for this file into the head section of your HTML file.
-
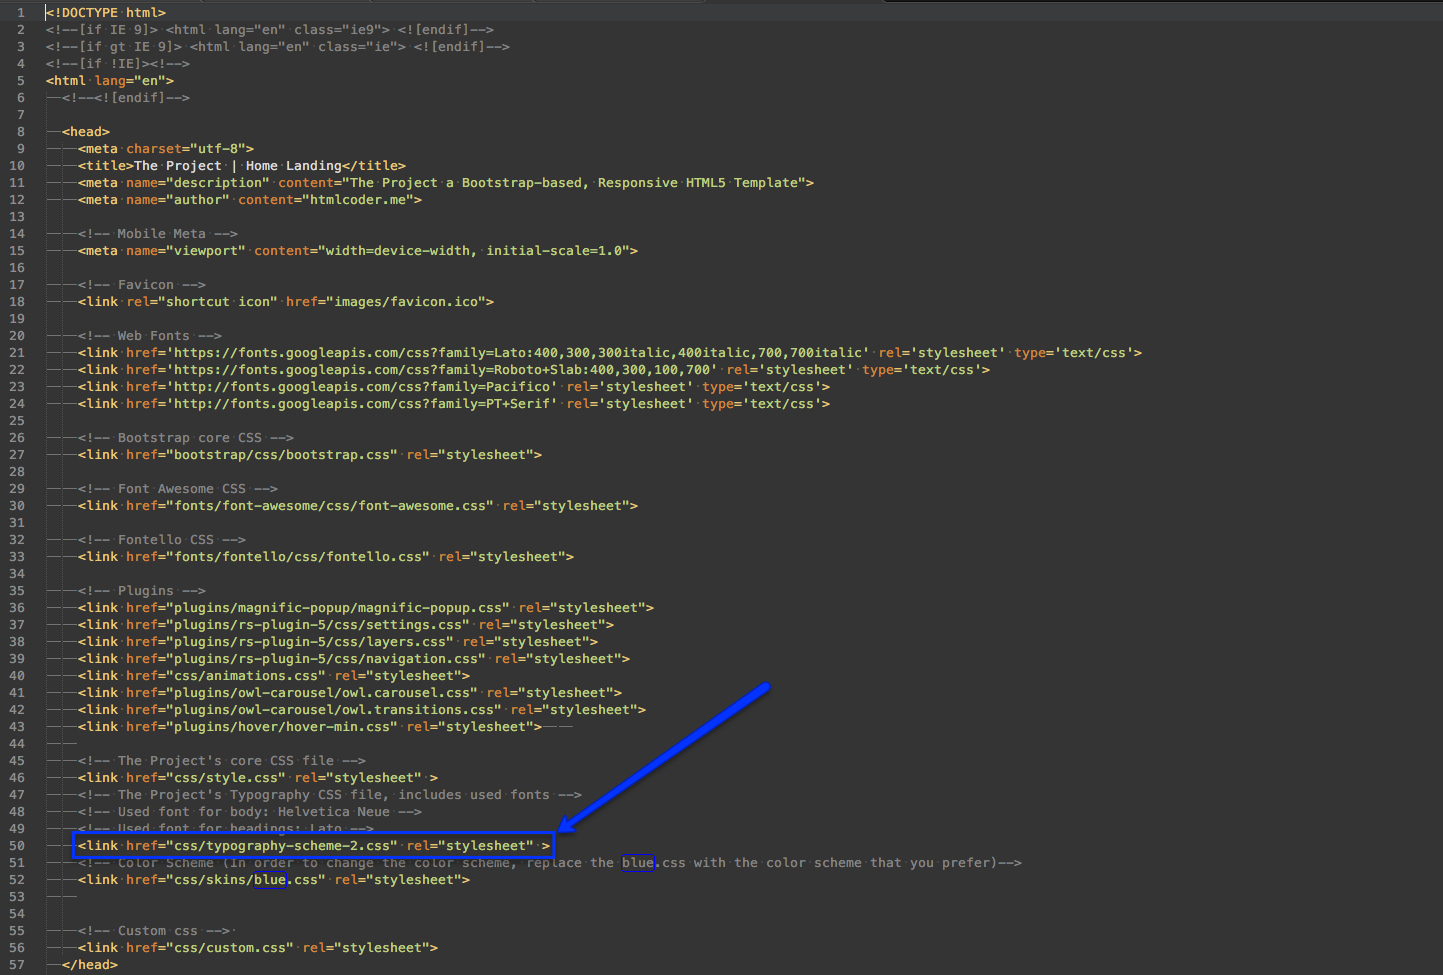
typography-scheme-2.css: Is added in version 1.3. Used fonts are Lato for the body and Roboto slab for the headings of the template.
In order to use this font scheme add a reference for this file into the head section of your HTML file.
Customization & Styles
Skins
To change the default color scheme, please replace the red.css to the following tag in your head:
<link href="css/skins/light_blue.css" rel="stylesheet">
Layout Style
The template has two different layout modes, Wide and Boxed. The wide one is the default option, if you want to use the Boxed version, add the boxed class to <body> tag as below:
<body class="boxed">
Background Patterns
There are 9 background patterns. Background patterns are available only in boxed layout mode. In order to apply a background pattern all you have to do is to add one of classes pattern-1 ... pattern-9 to body tag.
<body class="pattern-1 boxed">
Fonts
To change the embedded fonts, please take a look in the head part of the website and you will find these tags:
<link href="http://fonts.googleapis.com/css?family=Roboto:400,300,300italic,400italic,500,500italic,700,700italic" rel="stylesheet" type="text/css">
<link href="http://fonts.googleapis.com/css?family=Raleway:700,400,300" rel="stylesheet" type="text/css">
<link href="http://fonts.googleapis.com/css?family=Pacifico" rel="stylesheet" type="text/css">
<link href="http://fonts.googleapis.com/css?family=PT+Serif" rel="stylesheet" type="text/css">
To change the fonts, visit the http://www.google.com/webfonts choose a font and use the generated code.
Header Top Options
Dark Header Top
To make the background of header-top dark, add the class dark to .header-top.
<div class="header-top dark">Example: features-headers-classic-dark.html
Colored Header Top
To apply the color of the current color-scheme to the background of header-top, add the class colored to .header-top.
<div class="header-top colored">Example 1: features-headers-colored.html
Example 2: features-headers-colored-dark.html
Light Header Top
To make the background of header-top light you don't need to add any classes to .header-top.
<div class="header-top">Example: features-headers-classic.html
Header Options
Fixed Header
By default the positioning of main navigation is set to fixed. To change this behavior delete the fixed class from the header.
<header class="header fixed clearfix">Example of static header: features-headers-simple.html
Dark/Light header
By default the header is light add the dark class to .header in order to change it from light to dark version.
<header class="header fixed dark clearfix">Example of Light Header: features-headers-classic.html
Example of Dark Header: features-headers-classic-dark.html
Transparent header
Add the transparent class to body in order to make the header transparent.
<body class="no-trans transparent-header">Example of Default/Semi Transparent: features-headers-default.html
Example of Dark/Semi Transparent: features-headers-default-dark.html
Predifined Header Examples
Default/Semi Transparent: features-headers-default.htmlDark/Semi Transparent: features-headers-default-dark.html
Classic Light: features-headers-classic.html
Classic Dark: features-headers-classic-dark.html
Colored Light: features-headers-colored.html
Colored Dark: features-headers-colored-dark.html
Full Width: features-headers-full-width.html
Offcanvas Left: features-headers-offcanvas-left.html
Offcanvas Right: features-headers-offcanvas-right.html
Logo Centered: features-headers-logo-centered.html
Slider Top: features-headers-slider-top.html
Simple Static: features-headers-simple.html
Menu Options
In Order to disable the animations of main menu remove the class animated from the .main-navigation div.
<div class="main-navigation with-dropdown-buttons">Example: features-menus-onhover-no-animations.html
In Order to make the submenus open with click event instead of hover add the class onclick to the .main-navigation div.
<div class="main-navigation onclick with-dropdown-buttons">Example 1: features-menus-onclick.html
Example 2 (Animations Disabled): features-menus-onclick-no-animations.html
Dark/Light footer
By default the footer is Light add the dark class to #footer in order to change it from light to dark version.
<footer id="footer" class="dark">Example of Light Footer: features-footers-default.html
Example of Dark Footer: index-corporate-1.html
Page Loaders
We are using pace plugin in order to create amazing page loaders, for more info about pace plugin please visit http://github.hubspot.com/pace/docs/welcome/.
In order to apply a page loader to a page, add the following script to your html file, right before the closing body tag.
<!-- Pace javascript -->
<script type="text/javascript" src="plugins/pace/pace.min.js"></script>
see here how
Then add one of classes page-loader-1 ... page-loader-6 to body tag.
<body class="page-loader-1">
Take a look to the following examples:
Option 1: components-page-loaders.htmlOption 2: components-page-loaders-2.html
Option 3: components-page-loaders-3.html
Option 4: components-page-loaders-4.html
Option 5: components-page-loaders-5.html
Option 6: components-page-loaders-6.html
Icons
We are using three iconic font libraries in The Project Template checkout all available icons:
Sliders
1. Home Page Slider
Home page slider is implemented with Slider Revolution. Slider Revolution is an all-purpose slide displaying solution that allows for showing almost any kind of content with highly customizable, transitions, effects and custom animations. Due to its visual oriented interface and countless options, Slider Revolution is suited for beginners and pro’s alike!
More info here http://themes.themepunch.com/?theme=revolution_jq. See the detailed documentation of Slider Revolution plugin here.
Basic HTML markup of Full Screen Slideshow:
<div class="slider-banner-container">
  <div class="slider-banner-fullscreen">
    <ul class="slides">
      <!-- slide 1 -->
      <li> ... </li>
      <!-- slide 2 -->
      <li> ... </li>
      <!-- slide 3 -->
      <li> ... </li>
    </ul>
  </div>
</div>
Example: features-sliders-fullscreen.html
Basic HTML markup of Full Width Slideshow:
<div class="slider-banner-container">
  <div class="slider-banner-fullwidth">
    <ul class="slides">
      <!-- slide 1 -->
      <li> ... </li>
      <!-- slide 2 -->
      <li> ... </li>
      <!-- slide 3 -->
      <li> ... </li>
    </ul>
  </div>
</div>
Example: features-sliders-fullwidth.html
Basic HTML markup of Full Width Big Height Slideshow:
<div class="slider-banner-container">
  <div class="slider-banner-fullwidth-big-height">
    <ul class="slides">
      <!-- slide 1 -->
      <li> ... </li>
      <!-- slide 2 -->
      <li> ... </li>
      <!-- slide 3 -->
      <li> ... </li>
    </ul>
  </div>
</div>
Example: features-sliders-fullwidth-big-height.html
Basic HTML markup of Boxed Width Slideshow:
<div class="slider-banner-container">
  <div class="slider-banner-boxedwidth">
    <ul class="slides">
      <!-- slide 1 -->
      <li> ... </li>
      <!-- slide 2 -->
      <li> ... </li>
      <!-- slide 3 -->
      <li> ... </li>
    </ul>
  </div>
</div>
Example 1 Light Background: features-sliders-boxedwidth-light.htmlExample 2 Dark Background: features-sliders-boxedwidth-dark.html
Example 3 Default Background: features-sliders-boxedwidth-default.html
Slideshow with Video Background:
The video of slideshow is located into the videos folder. The filename of the video is background-video-banner. Just replace this file with your video file.Example: features-sliders-video-background.html
Text Rotator:
Morphext plugin is used to create simple text rotators. A simple, high-performance and cross-browser jQuery rotating / carousel plugin for text phrases powered by Animate.css. Please check the website of the plugin for more info http://morphext.fyianlai.com/
Example 1: features-sliders-text-rotator.htmlExamples: components-text-rotators.html
2. Content Sliders
OWL Carousel is used to create simple content sliders or carousels, please see components-content-sliders.html
OWL Carousel is touch enabled jQuery plugin that lets you create beautiful responsive carousel sliders. Please check the website of the plugin for more info http://owlgraphic.com/owlcarousel/
Variations of content slider:
1. Content Slider with Controls (Autoplay off)
<div class="owl-carousel content-slider-with-controls">
  <!-- first slide start -->
  <div>
  ...
  </div>
  .....
</div>
2. Content Slider with Controls 2 (Autoplay off)
<div class="owl-carousel content-slider-with-large-controls">
  <!-- first slide start -->
  <div>
  ...
  </div>
  .....
</div>
3. Content Slider without controls (Autoplay on)
<div class="owl-carousel content-slider">
  <!-- first slide start -->
  <div>
  ...
  </div>
  .....
</div>
4. Content Slider with Controls (Autoplay on)
<div class="owl-carousel content-slider-with-controls-autoplay">
  <!-- first slide start -->
  <div>
  ...
  </div>
  .....
</div>
5. Content Slider with Controls 2 (Autoplay On)
<div class="owl-carousel content-slider-with-large-controls-autoplay">
  <!-- first slide start -->
  <div>
  ...
  </div>
  .....
</div>
Variations of carousels:
1. Carousel (Autoplay off)
<div class="owl-carousel carousel">
  <!-- first slide start -->
  <div>
  ...
  </div>
  .....
</div>
2. Carousel (Autoplay on)
<div class="owl-carousel carousel-autoplay">
  <!-- first slide start -->
  <div>
  ...
  </div>
  .....
</div>
3. Clients
<div class="owl-carousel clients">
  <!-- first slide start -->
  <div>
  ...
  </div>
  .....
</div>
Lightbox
Magnific Popup is a responsive lightbox & dialog script with focus on performance and providing best experience for user with any device.
Please check the Magnific Popup documentation here http://dimsemenov.com/plugins/magnific-popup/documentation.html.
See lightbox examples in components-lightbox.html page.
Isotope Filtering
For the Filtering, The Project is using the Isotope plugin http://isotope.metafizzy.co/
You can find examples of isotope filtering in the following pages:
- index-portfolio.html
- portfolio-grid-1-2-col.html
- portfolio-grid-1-3-col.html
- portfolio-grid-1-4-col.html
- portfolio-grid-1-sidebar.html
- portfolio-grid-2-2-col.html
- portfolio-grid-2-3-col.html
- portfolio-grid-2-4-col.html
- portfolio-grid-2-sidebar.html
- portfolio-grid-3-2-col.html
- portfolio-grid-3-3-col.html
- portfolio-grid-3-4-col.html
- portfolio-grid-3-sidebar.html
- portfolio-fullwidth-2-col.html
- portfolio-fullwidth-3-col.html
- portfolio-fullwidth-4-col.html
Contact form without Google reCAPTCHA
In order to setup the contact form WITHOUT reCAPTCHA:
-
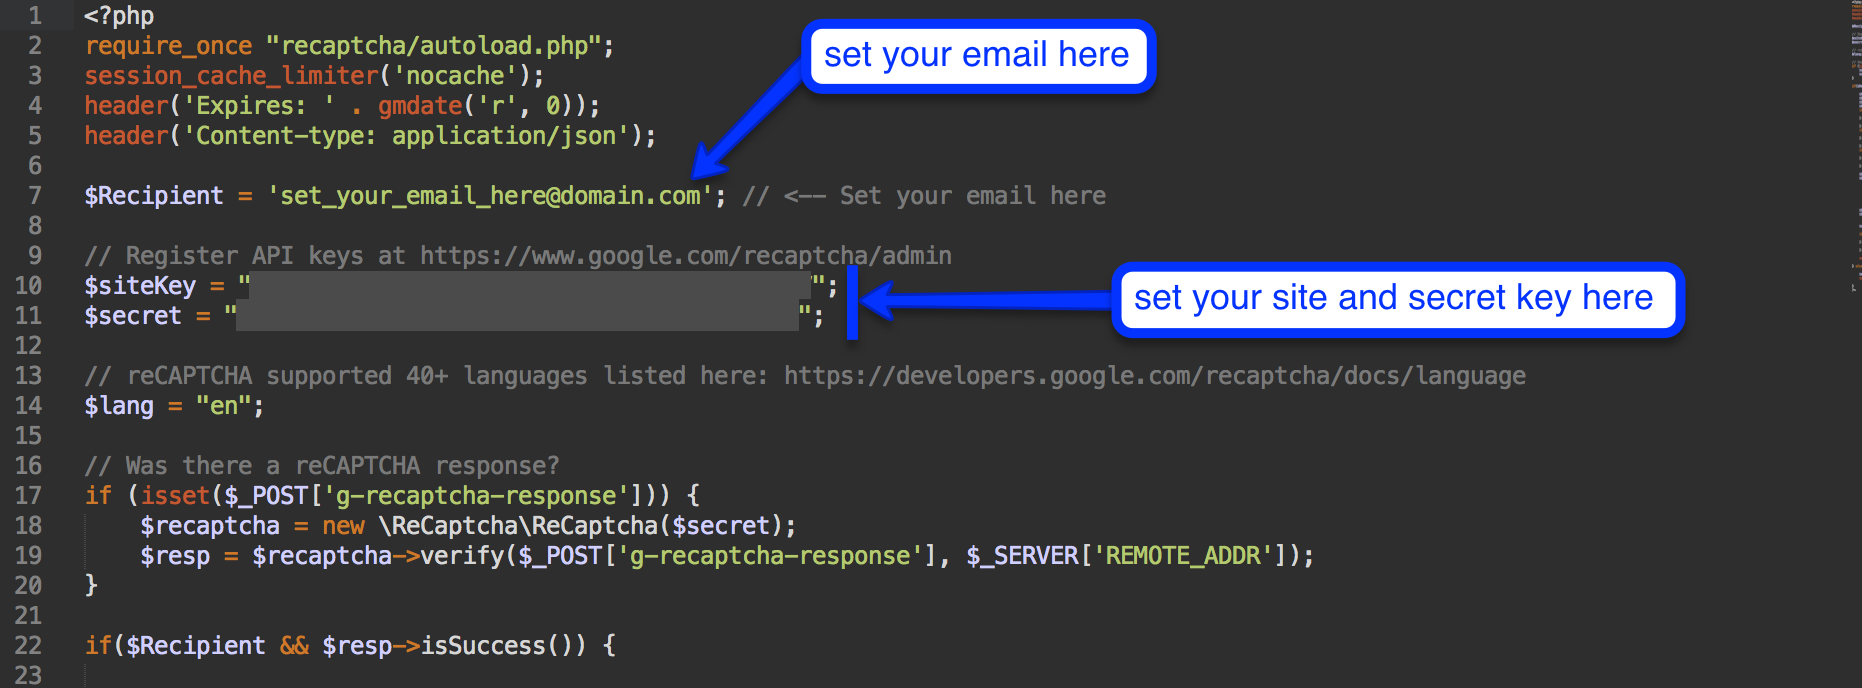
Set your email address inside php/email-sender.php file.
To do this, please open "php/email-sender.php" file and change this line:$Recipient = 'set_your_email_here@domain.com';
-
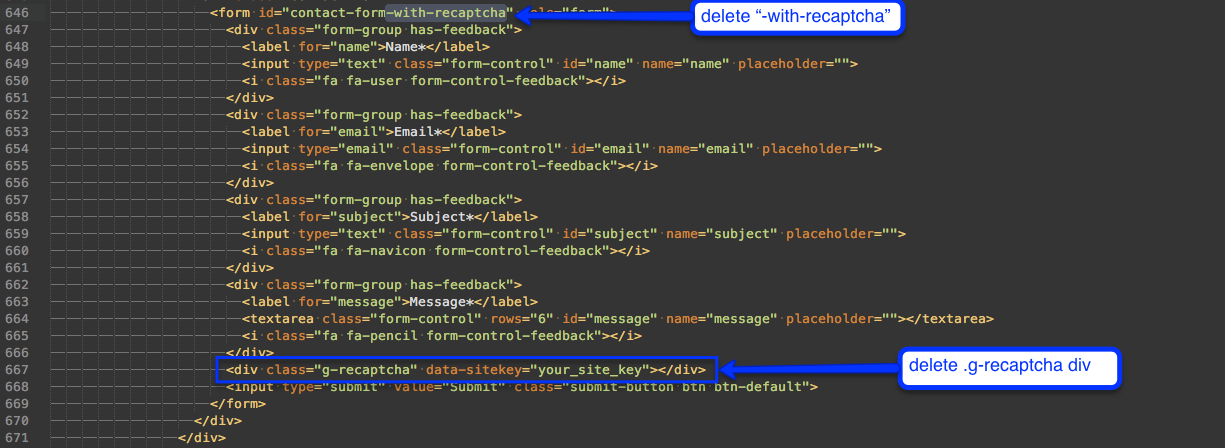
Change the id of contact form in page-contact.html or page-contact-2.html or page-contact-3.html from "contact-form-with-recaptcha" to "contact-form" and delete .g-recaptcha div:
The contact form is functional only on a live server with php support not localy on your pc.
Contact form with Google reCAPTCHA
In order to setup the contact form with Google reCAPTCHA.
Get your reCAPTCHA api keys from https://www.google.com/recaptcha/admin
In php/email-sender-recaptcha.php file set your API keys and your email address:
-
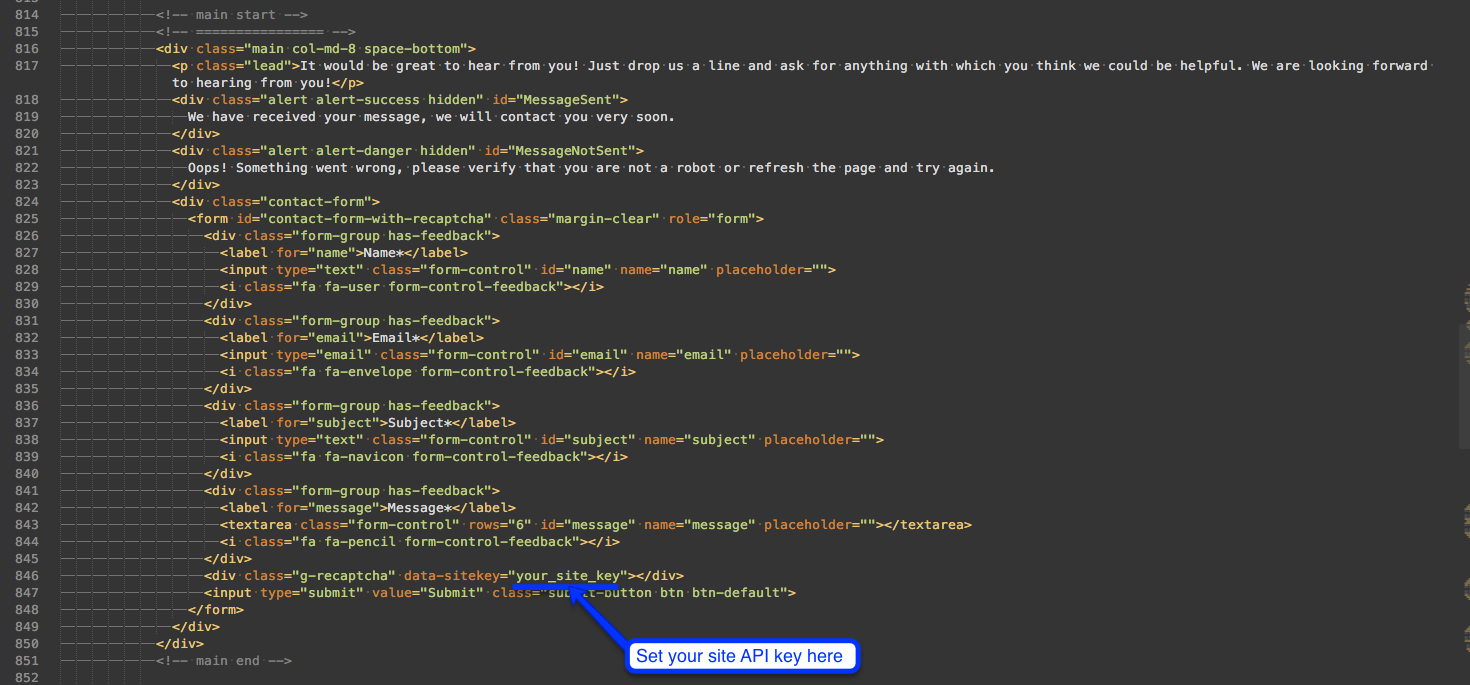
In page-contact.html or page-contact-2.html or page-contact-3.html set your site API key to the "data-sitekey" attribute of ".g-recaptcha" div:
You can find more info about Google reCAPTCHA in the following link https://developers.google.com/recaptcha/
The contact form is functional only on a live server with php support not localy on your pc.
Coming Soon Page
Regarding coming soon page only thing you need to do is to set the time at which the countdown expires.
To do this, please open "js/coming.soon.config.js" file and change this line:
		// var untilDate new Date(Year, Month - 1, Day)
		//-----------------------------------------------
		var untilDate = new Date(2017, 2 - 1, 1);
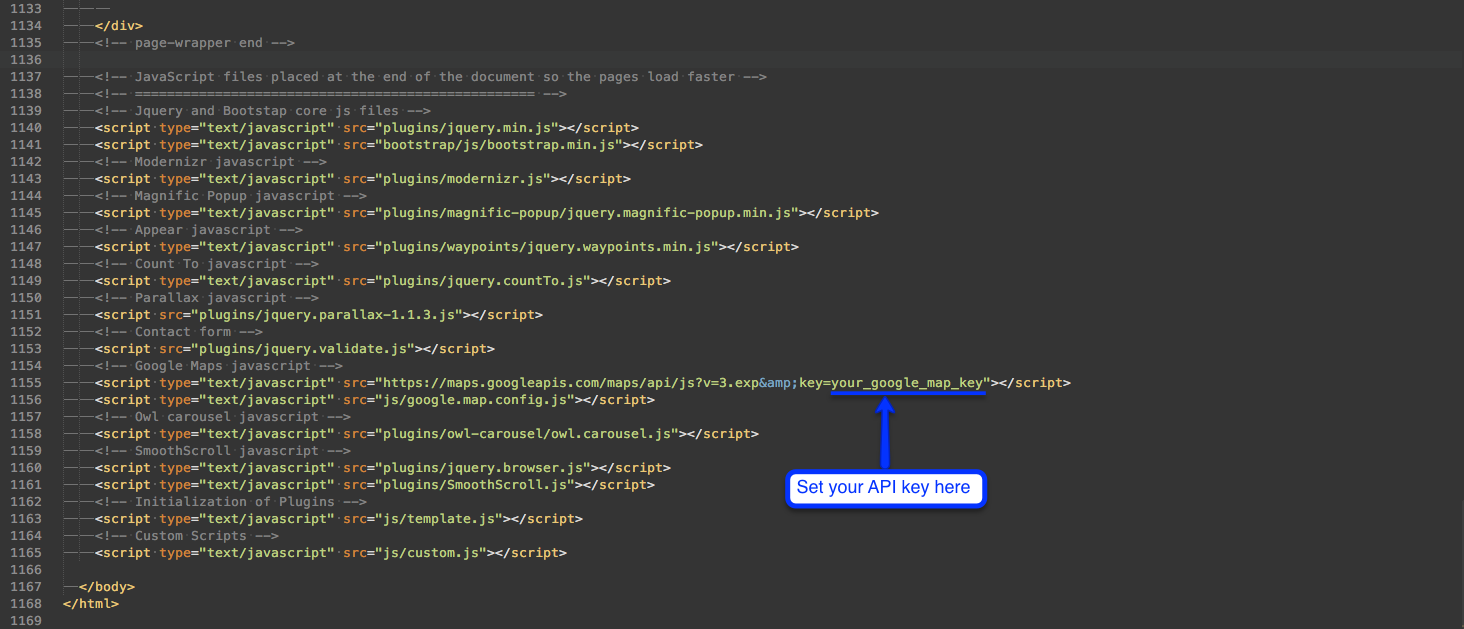
Google Maps
The Project comes with a great Google maps integration. Making it easy for your visitor to locate your business on the map plays an ever-growing role nowadays.
In order to setup the Google maps:
Get your API key from https://developers.google.com/maps/documentation/javascript/get-api-key.
Set your API key inside the HTML file that you are using the google maps:
-
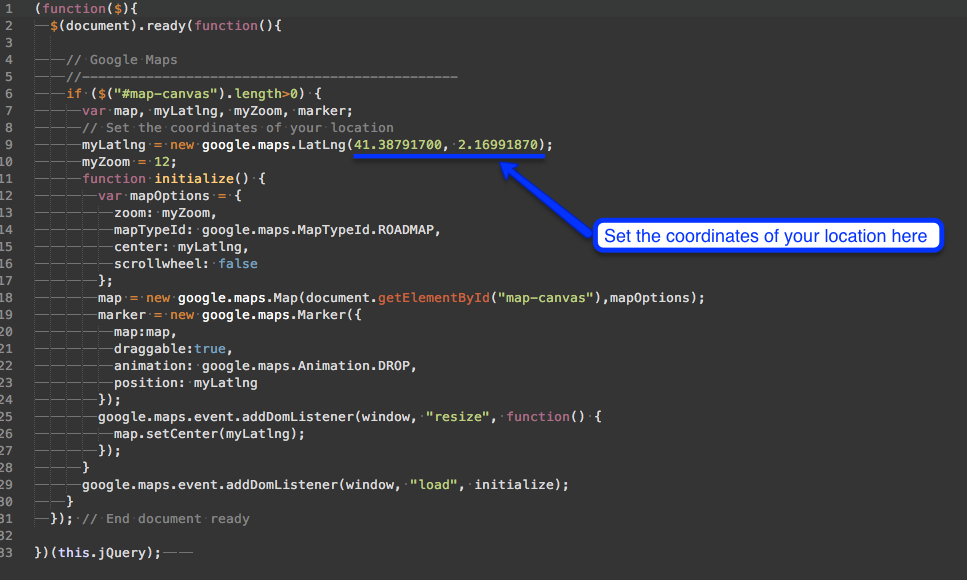
To set the location of your business change the default Latitude, Longitude and Zoom of the Google map, please replace the following values inside js/google.map.config.js file:
Animations Effect
animate.css http://daneden.github.io/animate.css/
You can add some Animations / Transitions to the elements which fires when an element scrolls into view. Great for emphasis, home pages, sliders, and general just-add-water-awesomeness.
Usage:
<div class="object-non-visible" data-animation-effect="fadeInLeft" data-effect-delay="0">
...
</div>
The Attribute data-effect-delay is Optional and is set in Miliseconds.
The animation can be set to:
- bounce
- flash
- pulse
- rubberBand
- shake
- swing
- tada
- wobble
- bounceIn
- bounceInDown
- bounceInLeft
- bounceInRight
- bounceInUp
- fadeIn
- fadeInDown
- fadeInDownBig
- fadeInLeft
- fadeInLeftBig
- fadeInRight
- fadeInRightBig
- fadeInUp
- fadeInUpBig
- flip
- flipInX
- flipInY
- lightSpeedIn
- rotateIn
- rotateInDownLeft
- rotateInDownRight
- rotateInUpLeft
- rotateInUpRight
- slideInUp
- slideInDown
- slideInLeft
- slideInRight
- zoomIn
- zoomInDown
- zoomInLeft
- zoomInRight
- zoomInUp
- hinge
- rollIn
Custom The Project animations
- fadeInUpSmall
- fadeInDownSmall
- fadeInLeftSmall
- fadeInRightSmall
Credits
Demo images
- Unsplash by Crew - http://unsplash.com/ - License
- Gratisography by Ryan McGuire - http://www.gratisography.com/ - License
- Raumrot by Markus Spiske - http://raumrot.com/ - License
- Jeshoots by Jan Vasek - http://jeshoots.com/ - License
- Pexels by Ingo Joseph, Bruno Joseph and Tizian Lengemann - http://www.pexels.com/ - License
- Pixabay by Braxmeier & Steinberger GbR - http://pixabay.com/ - License
- Lorempixel by Felix Holler - http://lorempixel.com/ - License
- Nick Nguyen - https://www.flickr.com/photos/nicktakespics/
- Christian Kadluba - https://www.flickr.com/photos/pokpok/
- Ruocaled - https://www.flickr.com/photos/ruocaled/
- Martin Cathrae - https://www.flickr.com/photos/suckamc/
- Robin - https://www.flickr.com/photos/fotoosvanrobin/
- Pink Sherbet Photography - https://www.flickr.com/photos/pinksherbet/
- Fotolia - http://eu.fotolia.com/
- Perfect Pixels - http://p-px.com/
The images used on the live demo website are for demonstration purposes only and are not included in the file for download.
Videos
- Life of Vids by Leeroy - http://www.lifeofvids.com/ - License
- Beachfront B-Roll - http://www.beachfrontbroll.com/ - License
Patterns
- Subtle Patterns by Atle Mo - http://subtlepatterns.com/ - License
Fonts
- Font Awesome by Dave Gandy - http://fortawesome.github.io/Font-Awesome/ - License
- Fontello Authors - http://fontello.com/ - License
- Entypo by Daniel Bruce and Andreas Blombäck - http://www.entypo.com/ - License
- Typicons by Stephen Hutchings - http://typicons.com/ - License
- Google Fonts - http://www.google.com/fonts
Resources
- Bootstrap Framework by @mdo and @fat - http://getbootstrap.com/ - License
- Jasny Bootstrap by Arnold Daniels - http://jasny.github.io/bootstrap/ - License
- Bootstrap Notify by Mouse0270 aka Robert McIntosh - https://github.com/mouse0270/bootstrap-growl - License
- jQuery - https://jquery.org/ - License
- Chart.js - by Nick Downie - http://chartjs.org/ - License
- Morphext - by Ian Lai - http://morphext.fyianlai.com/ - License
- jQuery Countdown to by Keith Wood - http://keith-wood.name/countdown.html - License
- jQuery Count to by Matt Huggins - https://github.com/mhuggins/jquery-countTo - License
- jQuery Knob to by Anthony Terrien - https://github.com/aterrien/jQuery-Knob - License
- jQuery Validate by Jörn Zaefferer - http://jqueryvalidation.org/ - License
- jQuery Magnific popup by Dmitry Semenov - http://dimsemenov.com/plugins/magnific-popup/ - License
- Vide by Ilya Makarov - http://vodkabears.github.io/vide/ - License
- Slider Revolution by Themepunch - http://themes.themepunch.com/?theme=revolution_jq
- Owl carousel by Bartosz Wojciechowski - http://owlgraphic.com/owlcarousel/ - License
- jQuery Parallax by Ian Lunn - http://www.ianlunn.co.uk/plugins/jquery-parallax/ - License
- Waypoints by Caleb Troughton - http://imakewebthings.com/waypoints/ - License
- Modernizr - http://modernizr.com/ - License
- Pace by Hubspot - http://github.hubspot.com/pace/docs/welcome/ - License
- Fullpage by Alvaro Trigo - https://github.com/alvarotrigo/fullPage.js - License
- Animate CSS by Daniel T. Eden - http://daneden.github.io/animate.css/ - License
- Hover CSS by Ian Lunn - https://github.com/IanLunn/Hover - License
- Isotope Jquery plugin by metafizzy.co - http://isotope.metafizzy.co - License A license to use the included Isotope v2 Library is provided, as part of our Developer License scheme for the plugin. As clarified in the license scheme possessed by htmlcoder.me: "Users do not need to purchase their own commercial license for the software, so long as they are not acting as Developers, developing their own commercial applications with the Software."
- reCAPTCHA by Google Inc - https://github.com/google/recaptcha - License
License
Third party code, that contained into plugins folder or into other folders, is licensed under its own license.
End of Documentation
Thank you very much for purchasing the Project template and for reading this documentation :-)
Social Media
Social Media HTML Markup
Colored social icons
Large icons
Add the class large to <ul> tag as below:
Square Icons
Add the class square to <ul> tag as below:
Circural icons
Add the class circle to <ul> tag as below:
Dark icons
Add the class dark to <ul> tag as below:
Default icons
Add the class default to <ul> tag as below:
Social Buttons
See more examples of social icons into components-social-icons.html page.